Progress Dots
Requires: PowerPoint on Windows. (This macro will crash Office X.)
This macro adds a toolbar to PowerPoint that can be used to create a "progress bar" for your presentation. A series of dots is drawn across the top border, corresponding to slides; and these dots change color as you advance through the presentation. The dots can be grouped into "sections," to indicate the overall structure of your talk. E.g., the generated progress bar could look something like this:

Toolbar
When the Progress Dots macro is run, it adds a new toolbar to PowerPoint:

The toolbar includes four buttons:
- Create: opens an options dialogue to customize the progress bar; and then draws the progress bar on each slide. (This can be slow for large powerpoint presentations.)
- Refresh: redraws the progress bar. You will need to use this after adding or removing slides, or section labels.
- Delete: removes the progress bar from each slide.
- Section: adds a section label to the current slide. All slides from the current slide to the next slide that you asssign a section label to are considered to be part of the same section, and will be displayed in a group. E.g., in the example above, four slides are marked with section labels: the first is marked with "Intro," the fifth with "Topic 1," the ninth with "Topic 2," and the eighteenth with "Conclusions." To remove a label from a slide, go to that slide, click "Section", clear the value, and click ok.
Customization
When a new progress bar is created, a customization dialogue may be used to fine-tune the progress bar's appearance.
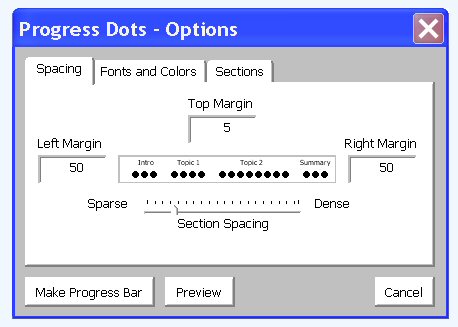
The progress bar settings will be saved with the powerpoint file.
Installing
To install progress dots:
|
To uninstall progress dots:
|
Editing
If you'd like to edit the macro, to make your own customizations to it:
- Open the file "progress_dots.ppt"
- Under the "Macros" submenu of the "Tools" menu, slect "Visual Basic Editor"
- If you'd like to just browse the code without opening it up in PowerPoint, it's available here: progress_dots.html.
Disclaimer: this is the first program I've written in Visual Basic, so the code may not be as clean as it should be.
License
Copyright (C) 2007 Edward Loper
Permission is hereby granted, free of charge, to any person obtaining a copy of this software and any associated documentation files (the "Software"), to deal in the Software without restriction, including without limitation the rights to use, copy, modify, merge, publish, distribute, sublicense, and/or sell copies of the Software, and to permit persons to whom the Software is furnished to do so, subject to the following conditions:
The above copyright notice and this permission notice shall be included in all copies or substantial portions of the Software.
The software is provided "as is", without warranty of any kind, express or implied, including but not limited to the warranties of merchantability, fitness for a particular purpose and noninfringement. In no event shall the authors or copyright holders be liable for any claim, damages or other liability, whether in an action of contract, tort or otherwise, arising from, out of or in connection with the software or the use or other dealings in the software.